

How to set up a business card for print in indesign
Follow our Step by Step tutorial to learn how to correctly set up your business card for print in Adobe Indesign.
- To help you get started, you can download our FREE Business Card Indesign Template.
- You can also watch a video version of this tutorial here.
- To obtain a quote for business cards read more about our business card print options here.

Time Needed: 30 minutes
Total Cost: AUD100
Things Needed?
Current Adobe Creative Cloud License.
Your logo, Images, Fonts etc.
Basic Graphic Design Skills.
Required tools:
A Computer.
Internet connection.
Adobe InDesign installed.
Set up and Export your File
Step 1: Open Indesign and Set Up Your Pages
- Open Indesign
- Click 'Create New'
- In the Preset details, enter the size for your business card. For a standard business card, enter a width of 90mm and a height of 55mm
- Untick 'Facing Pages'
- Enter 2 pages
- Margins: 3mm
- Bleed and slug: enter3mm and link to all sides/edges
- Click 'Create'

Step 2: Complete your design
- Complete your design, ensuring you use the following:
- High resolution images - 300DPI
- Logo and other graphical elements in vector or EPS, ideally created in Illustrator
- Avoid text-based images but if they must be used, ensure the image is 800DPI
- Text no smaller than 7ptfor legibility
- Ensure your design has plenty of clear space from the edges - keep important elements within the3mm margins you created in step 1.

Step 3: Export to Press Ready PDF
- Before you export, double check your design - ensure all colours/graphics bleed to the edge (the red outer line), and no text goes beyond the margins
- Ensure all placed images/vectors are either linked or embedded
- Click File - Export - Adobe PDF (Print)
- In the General tabselect the following:
- Export as Pages
- Select All Pages (assuming you are exporting all pages in the document)
- In the Compression tabselect the following:
- Colour images: 300PPI, Automatic (JPEG), Image Quality: Maximum.
- Repeat in the Greyscale and monochrome options if your artwork utilises these
- click 'Compress text and line art'
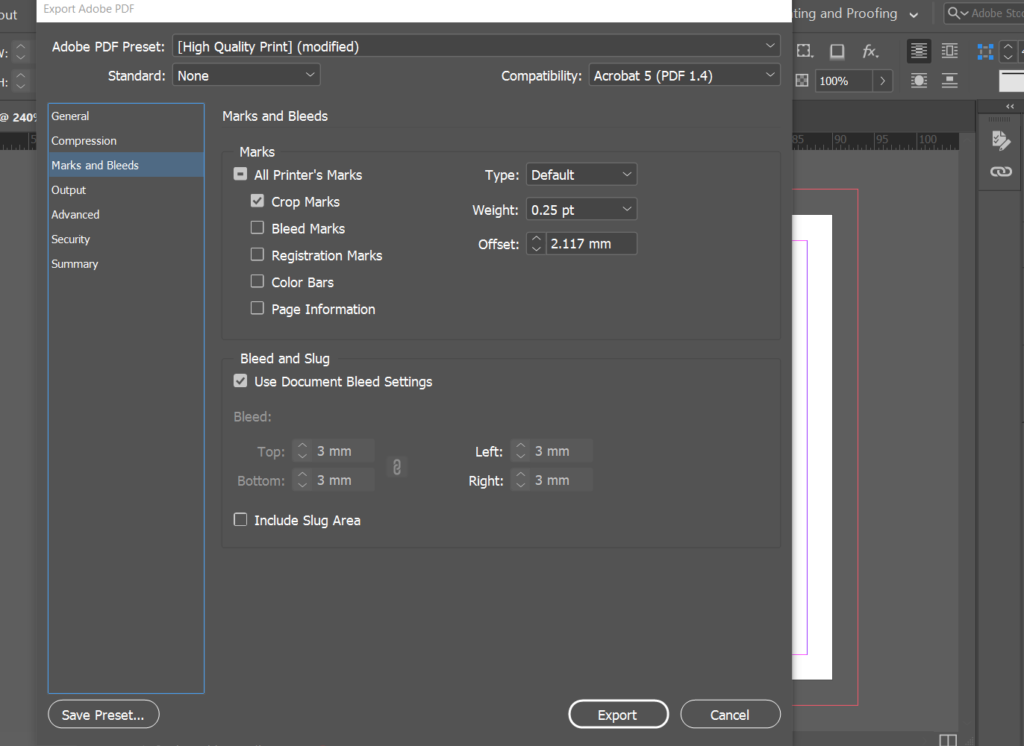
- In the Marks and Bleeds tab:
- in Marks just select 'Crop Marks'
- in Bleeds tick 'Use document settings' which should show 3mm on all 4 edges
- in Output: Convert to destination, select Document CMYK, and DON'T include profiles. Click on Ink Manager and check if there are any spot (Pantone) colours. If they are, just click 'All spots to process'
- You can now click the Export buttonto export your file to PDF.
Step 4: Check your file and send to us for print!
- Open up your PDF to make sure everything looks as you want it to.
- Ensure that you can see Crop Marks and that the art bleeds beyond that (note: bleed marks aren't required)
- Fix any errors in Indesign as required and re-export
- If you are happy with your digital proof, send through to us for print.To do so, you can email us the file quotes@rogueprintandmail.com.au or upload to our wetransfer site: https://rogueprintandmail.wetransfer.com/


